Tip: Start typing in the input box for immediate search results.
Remote Desktop
Introduction
Remote Desktop is a method of logging in to a computer or server that you are not physically close to. There are many reasons to do this, the majority of these being one of the following needs:
- You need to use an application that is not available on your computer. This could be a Windows-only application for a mac user, or something like Jenzabar which is easier to install only on one central server.
- You need a faster computer that is closer to the datacenter (networking-wise). Session Host (RDSH) servers provide the reliable connections that many users need between the software that they use and the background databases. Using an RDSH server offloads potential problems between your work computer and the database so that a lost connection only pauses the remote session, instead of crashing the application.
Prerequisites
There are a few requirements before you can follow the instructions detailed below.
- Make sure that your Multi-Factor Authentication (MFA) settings are properly configured as Gordon College requires. Visit this article for details.
- Assure that you are connected to the Gordon College Network. There are two options for this. First, if you are on-campus, you will need to be connected to "Gordon_Wifi" with your computer OR be plugged in to an ethernet cord. Second, if you are off-campus or at a location that does not have Gordon Wifi, you will need to connect to the VPN. See details at this article.
If you have already connected before...
If you are connecting to the same remote desktop to which you have connected at least once before, you process is much easier. All you have to do is find and double-click the file that you downloaded earlier, authenticate, approve on your phone, and you're in!
**Note: some people like to save the ".RDP" file to their desktop and rename it for easy access. Feel free to do so.
Connecting to Gordon's Remote Desktops
If you are in need of a remote desktop environment for work, please follow the steps below to get into the system.
1. Open a web browser such as Google Chrome or Safari and head to https://desktops.gordon.edu


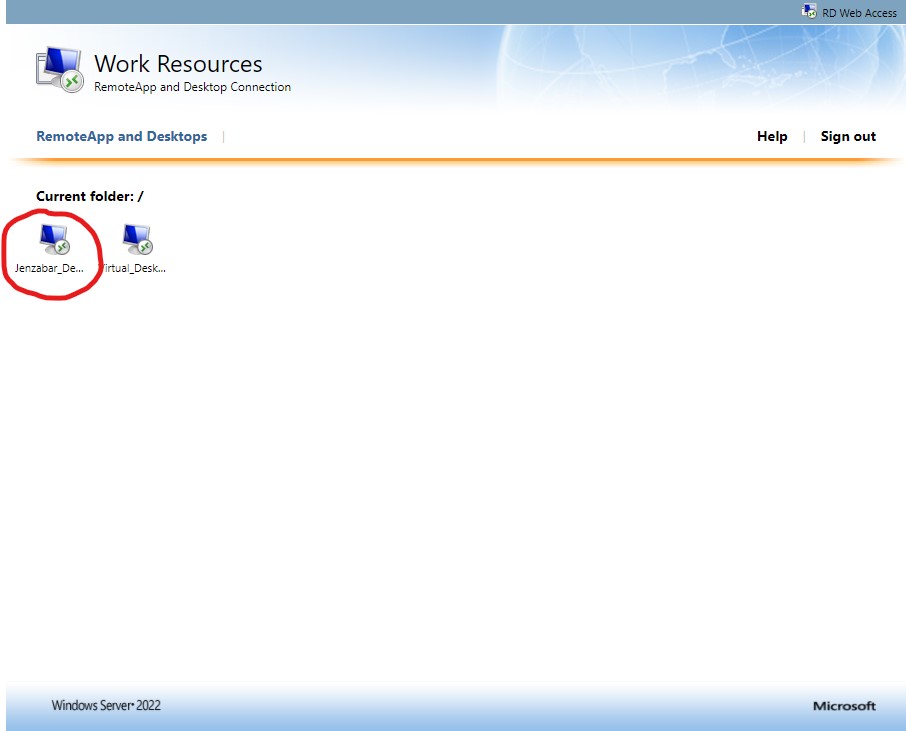
3. The next page on that website will show the list of remote servers that are available to you. Click one of the options to download the RDP file.
** An RDP file contains the configuration information that your computer needs to connect to the server in question. Assuming that you have Microsoft's Remote Desktop application installed, your computer will already know what to do with the file.

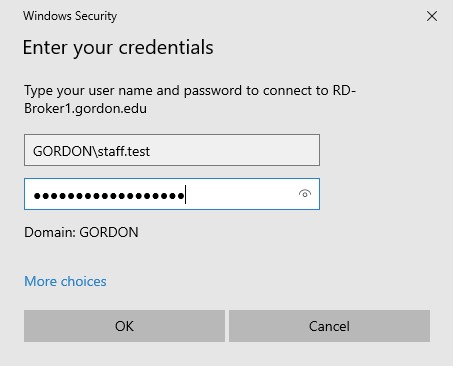
5. A login screen will appear where you can once again enter your username and passphrase. Press "OK" when you have entered your information.
**Don't forget to type "GORDON\" before your username. Alternatively, you can just enter your email address (ex. [email protected])

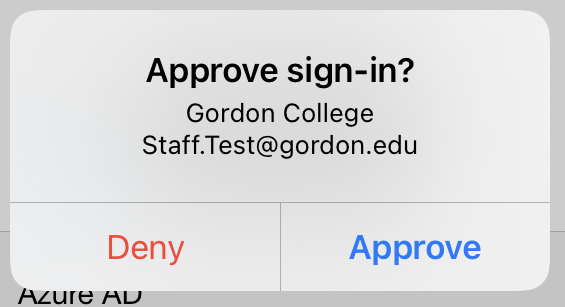
6. After a delay of up to 30 seconds, a Multi-factor authentication popup will appear on you phone. Approve the request to connect.
** Please note that if your MFA settings are not configured properly on mail.gordon.edu, the aforementioned popup will not show up on your phone.
7. Once you approve the popup notification on your phone, your computer will connect to the remote desktop session.
8. Once you are connected, you can use any available applications on the computer as you would if it was your own windows machine.
If you need any particular software installed on a remote desktop environment, please don't hesitate to contact CTS at [email protected]
After the first time that you follow this process, you can skip a few of the steps at the beginning and the workflow will be much shorter. In this case, start from step 4.
