
Tip: Start typing in the input box for immediate search results.
OneDrive Migration: Disabling iCloud Backup
Apple iCloud Desktop/Documents backup must be disabled to allow OneDrive backup to sync all of your documents
Disable iCloud Backup
Begin by clicking on the Apple logo located in the upper-left corner of your screen, then proceed to access the System Preferences (System Settings on newer versions of MacOS).

Within the Settings menu, select your Apple ID from the options listed in the left-hand panel, and proceed to navigate to the iCloud settings.

Once you're in the iCloud settings, you will encounter a list of apps that utilize iCloud. From this list, choose "iCloud Drive."

Following this step, a pop-up window will appear. Simply toggle the "Desktop & Documents" option to the "off" position.

When you deselect this option, a warning message may appear. Proceed to turn off the settings, as you'll soon be copying the files back from iCloud.

Copy iCloud files back to Desktop/Documents
Once you've successfully disabled this option, your files will begin the process of moving to iCloud. Please allow some time for this process to complete, as the duration may vary based on the amount of data stored in these folders.
Don't panic if it seems like your desktop and documents folders have disappeared from your computer. In fact they have been 'unlinked' from your computer after turning off iCloud Drive; your files are now safely (and exclusively) stored in iCloud.
The next step involves transferring your files from iCloud back to your local machine, enabling the setup of OneDrive.
Open Finder and navigate to the "iCloud" option in the sidebar. Within this location, you will discover both a "Desktop" and "Documents" folder containing the files originally stored on your machine.

Open one of the folders to view its contents, and then select all of the files by pressing "Command+A" on your keyboard. Now, drag these selected files to the local desktop or documents folder, depending on your preference. Be patient during this process, as it may take some time to download your documents to the new location.

You are now prepared to sign in and establish a connection with OneDrive!
Sign in to OneDrive
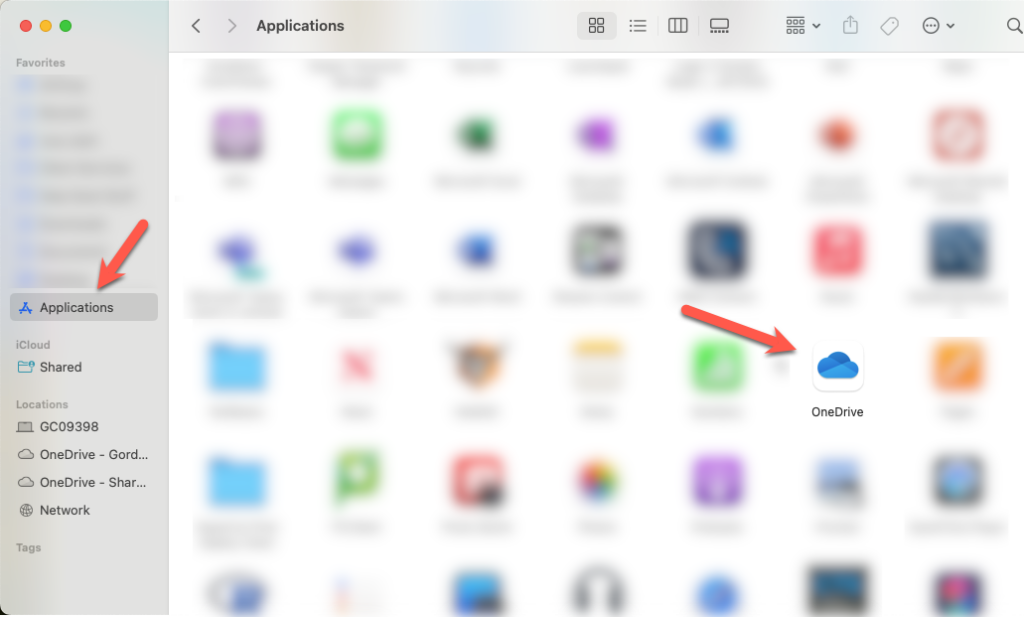
The Next step will be to open the OneDrive app from the applications folder and get signed in.
When OneDrive starts up, you'll be prompted to sign in with your Gordon email. Simply follow the upcoming prompts to enable and set up OneDrive.
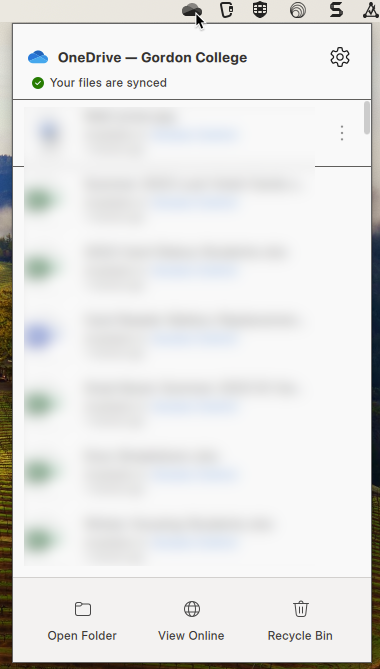
At the top of your computer screen, you should see the running OneDrive application. Click on it to access the status of your documents.
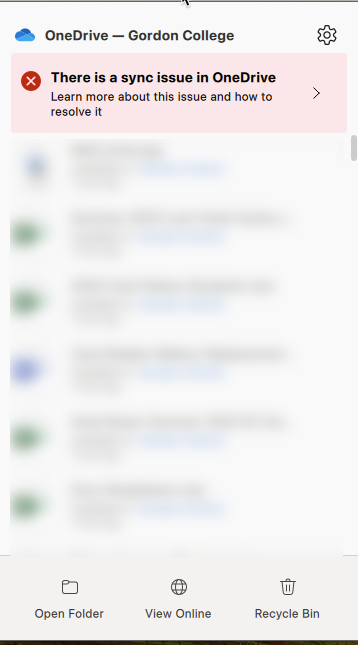
Sync Errors
A OneDrive sync error, specifically naming conflicts with bad symbols, occurs when the OneDrive sync app on a Mac encounters files or folders with names that include characters or symbols that are not compatible with the file system or cloud storage services. These "bad symbols" may include special characters, reserved characters, or symbols that are not allowed in file names by macOS or OneDrive.
To resolve naming conflicts with bad symbols in OneDrive on a Mac:
- Identify the Problematic File or Folder: Check the OneDrive sync error message to identify the specific file or folder causing the issue. It will typically provide information about the problematic name.
- Rename the File or Folder: You'll need to rename the file or folder to remove or replace the problematic symbols. Use only letters, numbers, hyphens, underscores, and periods in the file or folder name. Avoid using symbols like "*", "/", "", "?", ":", and others.
- Locate the File on Your Mac: Open Finder and navigate to the location of the problematic file or folder on your local machine.
- Right-Click and Rename: Right-click on the file or folder with the problematic name and select "Rename" from the context menu.
- Edit the Name: Edit the name to remove any bad symbols. Ensure the name adheres to standard naming conventions.
- Save the Changes: Press "Enter" to save the changes. If prompted, confirm the change.
- Sync Again: Once you've renamed the file or folder on your Mac, the OneDrive app should automatically detect the change and attempt to sync it again without errors.
Repeat these steps for any other files or folders that encounter naming conflicts with bad symbols during the OneDrive sync process. Keep in mind that it's essential to maintain compatible file names to ensure smooth synchronization with cloud storage services like OneDrive.
Bulk Renaming Files
When there are multiple files with symbols that OneDrive does not allow, it is often easier to bulk rename files.
Steps for bulk renaming:
Open Finder: Click on the Finder icon in your Dock or press "Command + Space" to open Spotlight and search for "Finder," then press "Enter" to launch it.
Use the Search Bar:
- In the Finder window, locate the search bar in the upper-right corner (it looks like a magnifying glass).
- Click on the search bar to activate it.
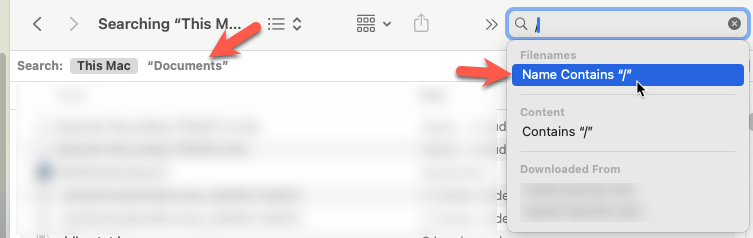
Enter the Search Criteria: To search for files with the "/" symbol, type a forward slash ("/") in the search bar. You can also add more specific criteria, like a file extension, if needed. Be sure to select the filename contains option and double check that you are searching the Documents/Desktop folder
View Search Results: Finder will display all files and folders that match your search criteria in the main window.
Select Multiple Files:
- To bulk select files, click on the first file in the list.
- Then, hold down the "Command" key on your keyboard.
- While holding "Command," click on each file you want to select. They will be highlighted.
Rename the Selected Files:
- With the selected files highlighted, right-click (or Control-click) on one of the selected files.
- From the context menu, choose "Rename X Items" (X will be the number of items you've selected).
Choose a Renaming Format:
- In the Rename dialog box that appears, you can choose how you want to rename the files. You can use options like "Replace Text," "Add Text," or "Format" to change the file names.
- If you only want to remove the "/" symbol, select "Replace Text" and enter "/" in the "Find" field and leave the "Replace With" field empty.
Preview and Apply: After configuring the renaming options, click the "Preview" button to see how the files will be renamed.
Apply the Renaming: If you are satisfied with the preview, click the "Rename" button to apply the changes. Finder will bulk rename the selected files, removing the "/" symbol.
Confirm Changes: If Finder asks for confirmation to rename files, click "OK" or "Continue."
Your selected files will now be renamed, and the "/" symbol will be removed from their names. Please exercise caution when renaming files in bulk to avoid accidental data loss. It's a good practice to make a backup of important files before making significant changes.
Having Trouble or Need further assistance?
Please do not hesitate to contact CTS if you have any questions or need further assistance with this process. We are here to help and can provide additional guidance if needed.
If needed we can book a quick remote help session to go over the process with you
https://outlook.office365.com/owa/calendar/[email protected]/bookings/s/6oqQ-4bjXkORMZpnyi2KIw2
Questions? Comments?
Call: 978-867-4500
Email: [email protected]
Visit Us: Jenks 317