
Tip: Start typing in the input box for immediate search results.
Help Desk 101

This article provides insights into some of the tools we use at the CTS helpdesk and their basic functionalities
Toby Page
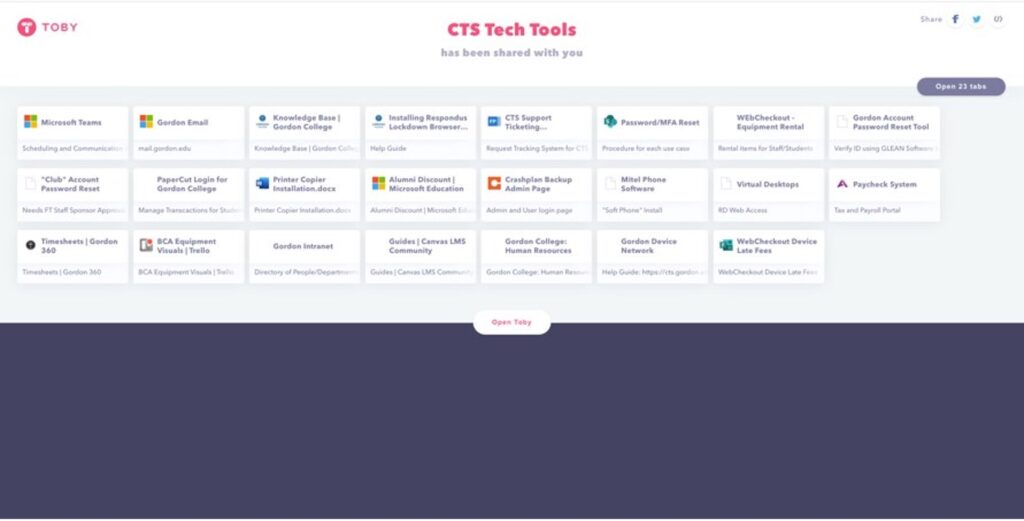
The Toby page is a helpful resource for navigating most of our day-to-day tools. Here, we can access resources like Passkey, WebCheckout, and various other tools.
https://www.gettoby.com/p/86gjbpntrvvp
Knowledgebase
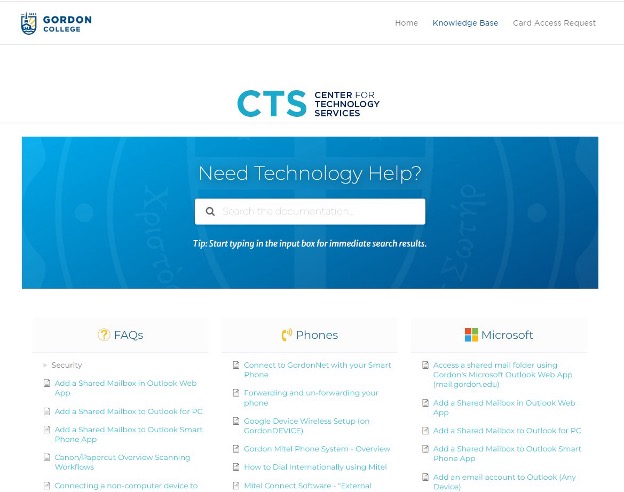
The CTS Knowledgebase hosts articles on basic campus technology functionality. Here, we can find utilities such as VPN, printer driver installations, LockDown Browser, and much more. There will be many cases where we need to direct clients to the Knowledgebase to get installers or learn how to configure various systems on their devices. Take time to look at some of the types of resources the Knowledgebase has to offer. Knowing that we have a preexisting article for a user's needs can save both you and the user time.
https://cts.gordon.edu/home/knowledge
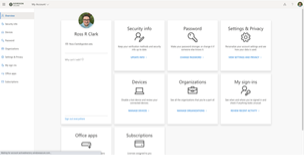
Mail.Gordon
We mainly use this for our day-to-day emails, but mail.gordon is also a powerful tool. This is where users can navigate to manage their passphrases, contact preferences, and MFA on their account. There will be many times that we direct users here, so familiarize yourself with the various options and capabilities on this website.
Passkey
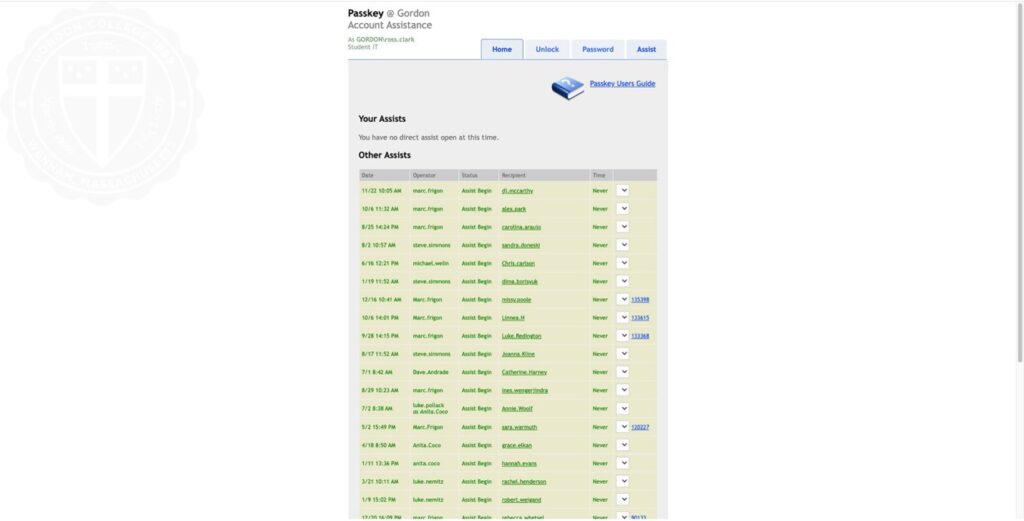
Passkey is the tool we use to reset passphrases and unlock accounts, a type of service we handle quite regularly at CTS. Passwords are only reset and accounts unlocked after verifying user ID with two forms of user information through "Glean."
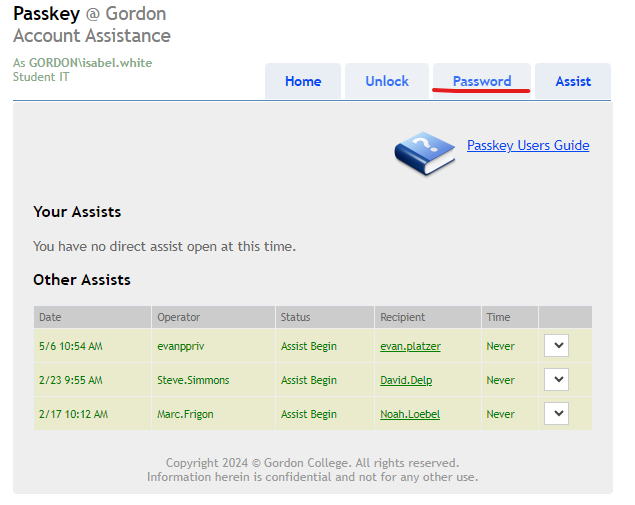
After verifying identity with glean by confirming the user's date of birth and the last 4 digits of their SSN, you can reset the user's passphrase by clicking the passphrase tab at the top and entering the user's Gordon username: first.last name
You then direct them to an incognito window of "mail.gordon.edu". They will manually sign in with their regular Gordon email (Note: instruct them not to use autofill) you will then give them their temporary passphrase. It should take them to a page that has 3 entry boxes, one for current passphrase, one for new passphrase, and one for confirm passphrase. They will put the temporary passphrase from passkey in as their current passphrase, and then set up a new passphrase that meets the requirements.
To unlock an account, you would still verify identity with glean, and then select the unlock tab next to the passphrase tab. Enter their usual Gordon username, and select the option to unlock the account, they should then be able to login as usual with their passphrase.
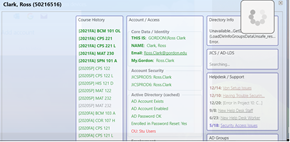
Glean

Glean is the Gordon college account lookup tool.
With this we can verify users information before resetting passphrases.
Glean is only available on the helpdesk computers.
To open glean, you can look it up in the start search, or select the magnifying glass icon on the start bar. You click it once, and it usually takes a bit to load, if you press it again in that time it will not open.
To search for users, use their first.last name and select the appropriate person from the options that appear.
You will then need to ask them for their date of birth and the last four digits of their SSN to make sure it matches our records and verify identity.
If one of those pieces of information is not available, you can ask them for the course codes of the classes they are currently taking and their student ID number as substitution for one but not both of them. You can double check with full-time staff if neither their birthday or 4 digits of SSN are available to ensure sufficient identity verification.
Glean can only be used to verify identity over the phone, no one should email their birthdate or last 4 digits of their SSN. Verifying identity should be done before sending any tickets regarding MFA resets or other account related issues.
Authenticator App
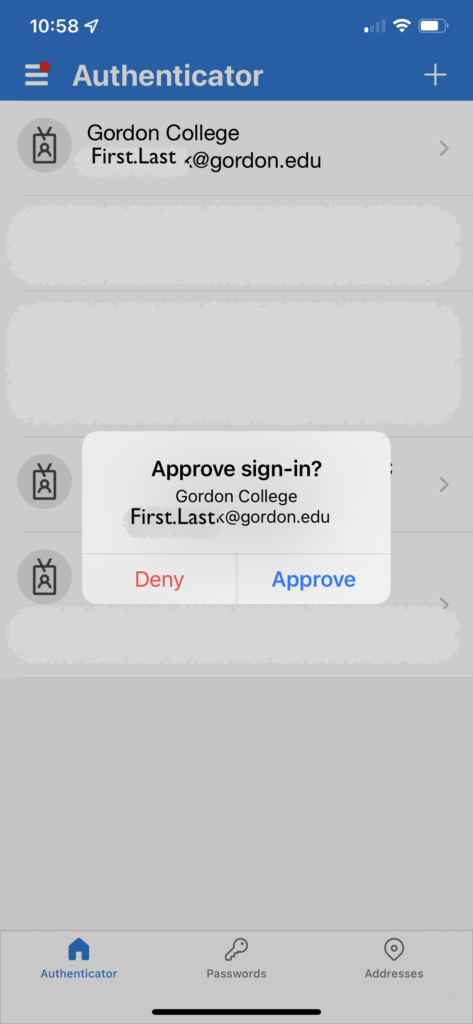
The Microsoft Authenticator app is used as an MFA tool for Gordon accounts. The app is required for things such as VPN and is recommended as an MFA option because it saves users the hassle of dealing with international numbers when traveling and works through Wi-Fi when cell reception is poor.
To set this up, we go through mail.gordon.edu to adjust the user's MFA settings and use the phone application to finish the configuration. One thing to note is that, in setting this up, a QR code must be scanned through the app itself, not through the phone camera.
ID Cards/Access Control
ID cards and door access are managed at CTS by Access Control. Any requests can be assigned in Footprints to Access Control. Any walk-in traffic can be directed to the Access Control team. Access Control is responsible for tasks like door scheduling, card replacements, new cards, broken cards, and all things related to doors.

WebCheckout
With Webcheckout we loan out equipment to the campus community.
We can track all of our resources here.
Login
You will login using your student ID number and a passphrase that you setup (NOTE: if you change your Gordon passphrase, your Webcheckout passphrase will not change automatically. You will have to manually change it for them to stay the same.)
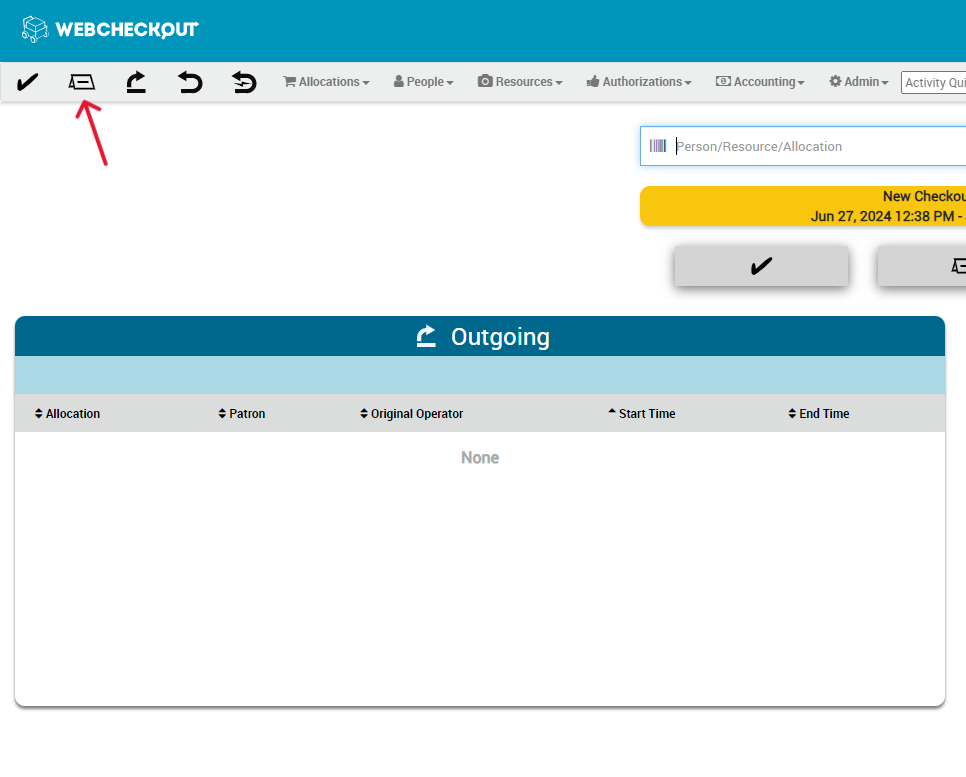
Checkout
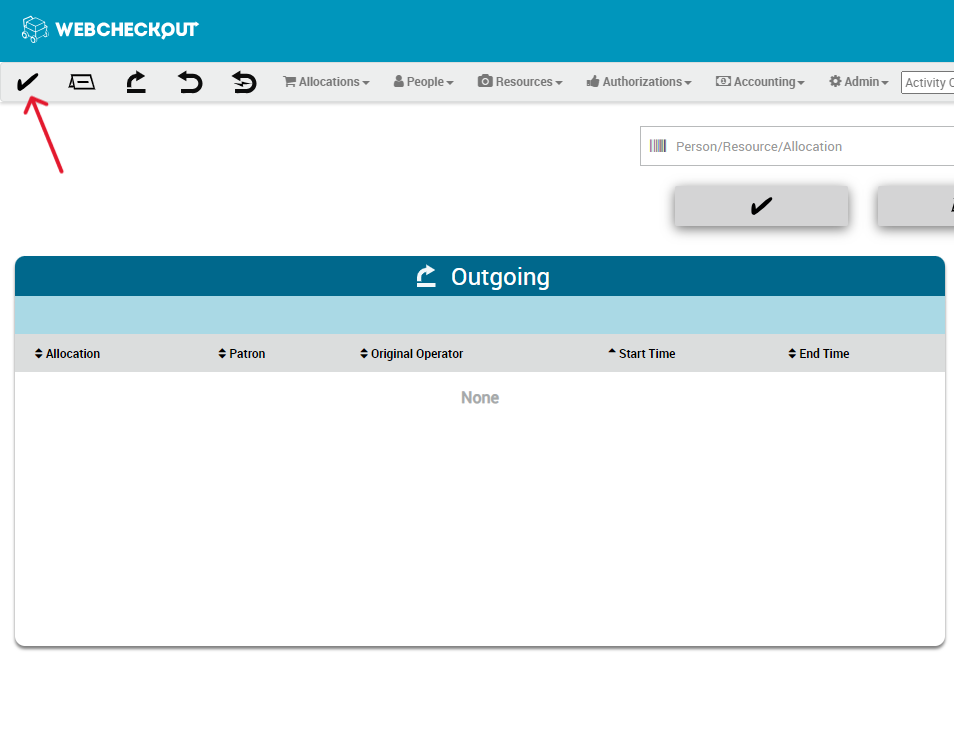
To checkout: click the checkmark in the upper left corner.
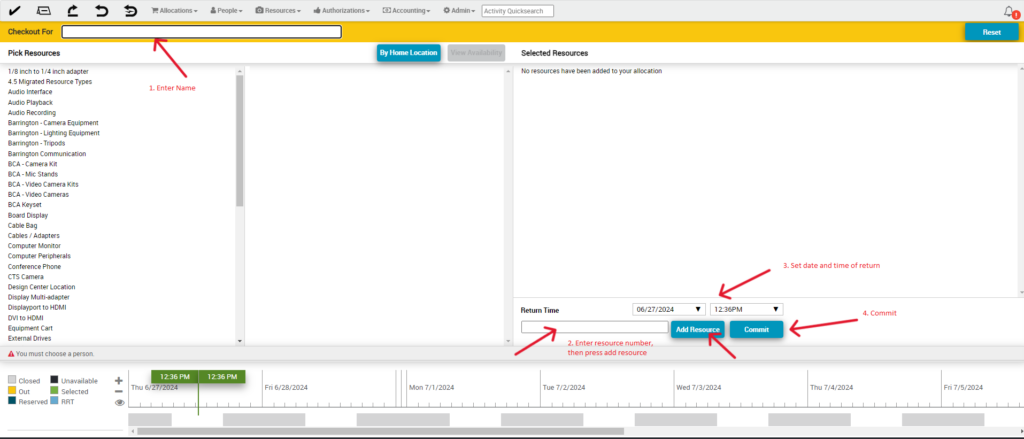
When brought to the page with the yellow banner, type in the person's name from their ID card, then put in the resource number(s) on the barcode of the item they are checking out and press add resource in the bottom right. Put in the date and time it needs to be returned and then press commit.
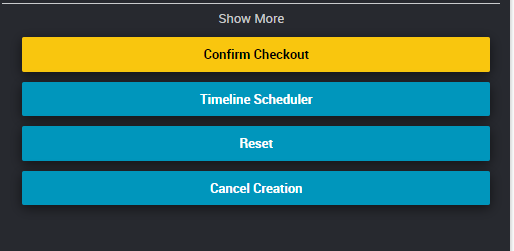
On the following page, verify everything is correct and then press confirm checkout. It will ask you for your pin and then they will need to sign the agreement form using the tablet on the front of the help desk.
Reservation
To make a reservation: click the folded card icon in the top left corner to the right of the checkmark icon.
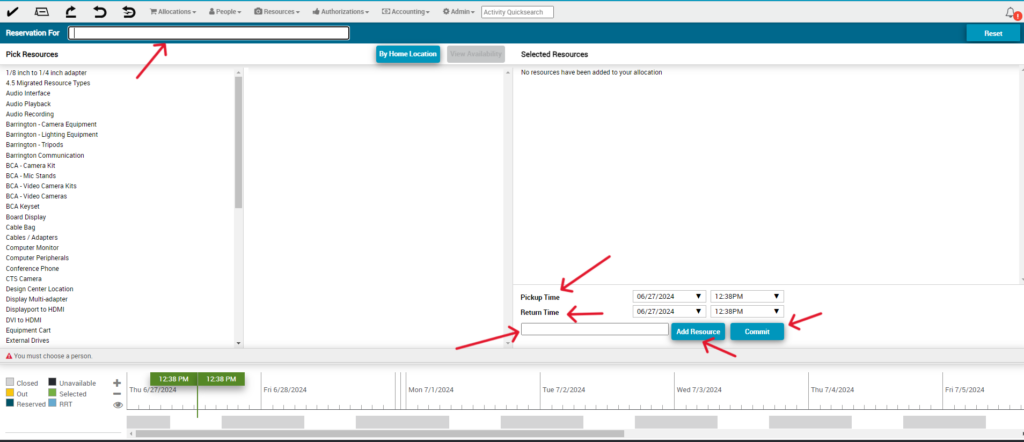
Complete the steps in the same way you do for a normal checkout: enter their name, the resource number(s) on the barcode, "Add Resource," set return and pickup time (the time they are going to collect it to use), then "Commit".
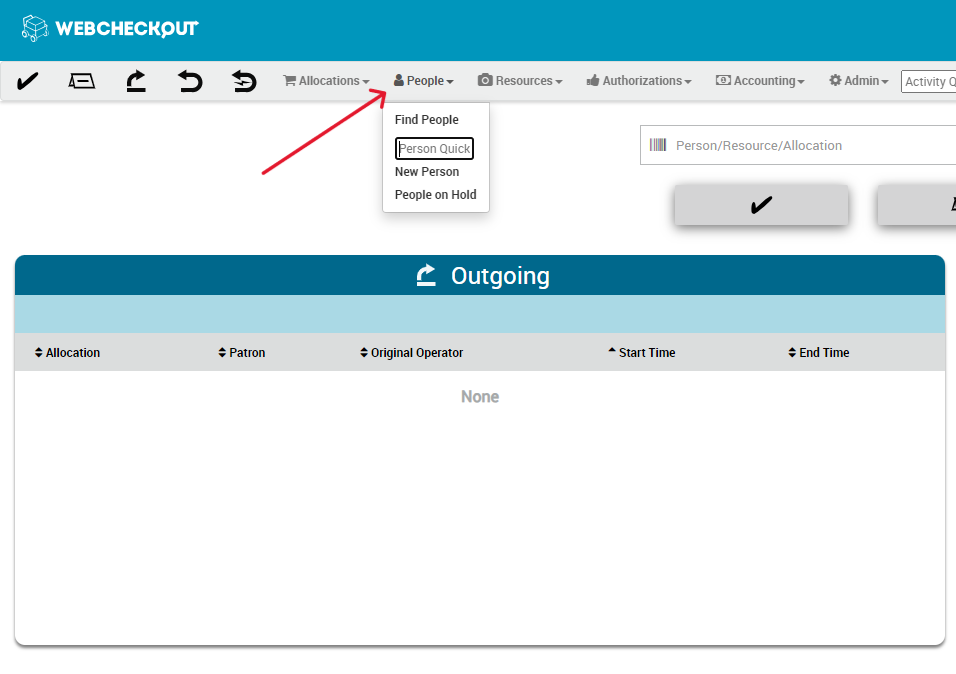
Search people
To search for people: click on "People" at the top of the screen and search for them by name, and then select the appropriate individual.
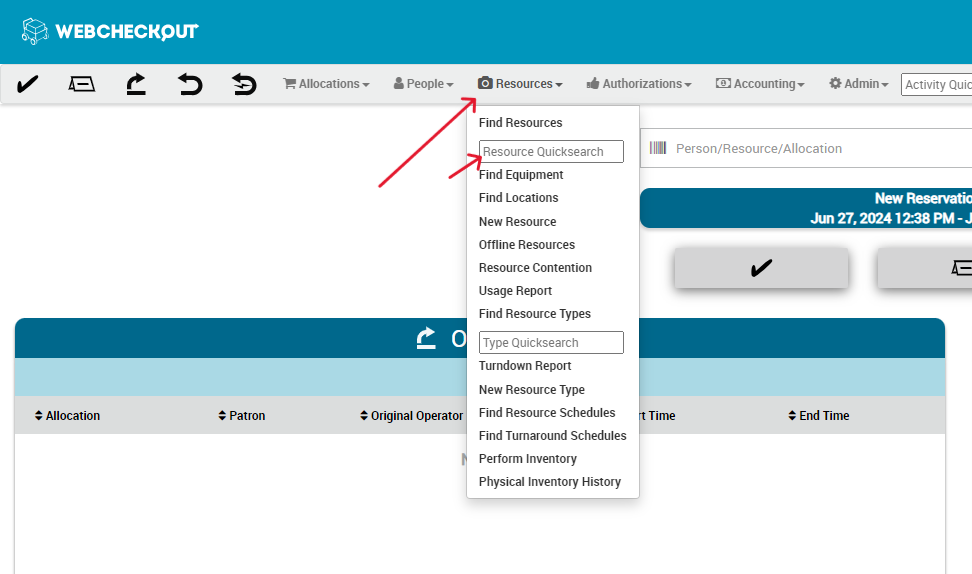
Search Resource
To search by resource: click on "Resources" on the top of the screen and search using the resource number on the barcode of the equipment.
Return Equipment
To return an item:
Use the steps above to search by person OR resource

If searching by person, under their activity tab, it should show their active allocations. You can click on the allocation number (usually preceded by CK-) to get to their checkout for the equipment.
If searching by resource, you can input the resource number found on the barcode for one of the items. On the left-hand side of the resource page, there should be an allocation number that you can select to bring you to the allocation page.

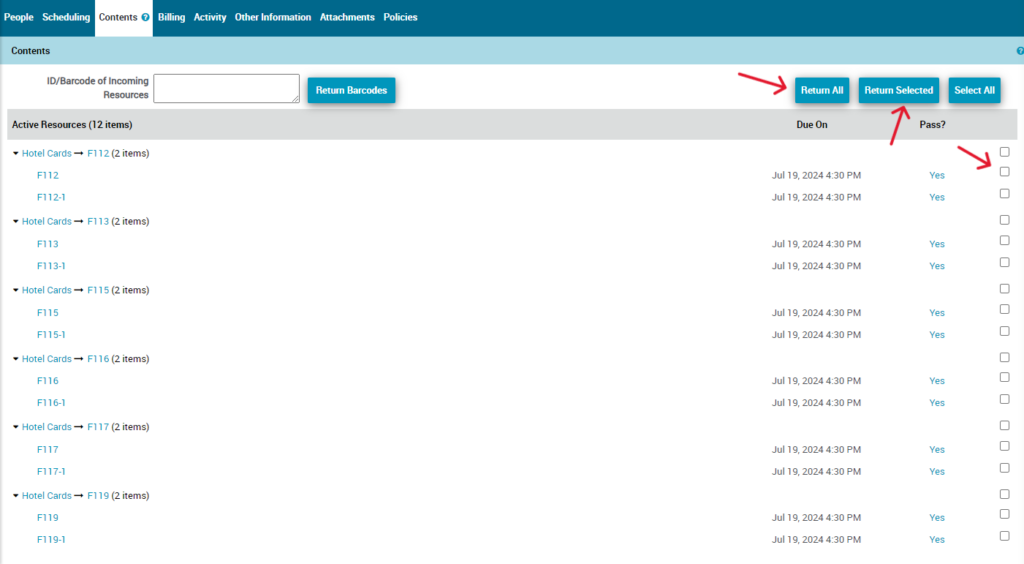
On the allocation page, you can either click "Return All" if you have checked and verified that all the equipment is there, or you can select the checkboxes of the returned equipment and then click "Return Selected".
BCA Trello Board
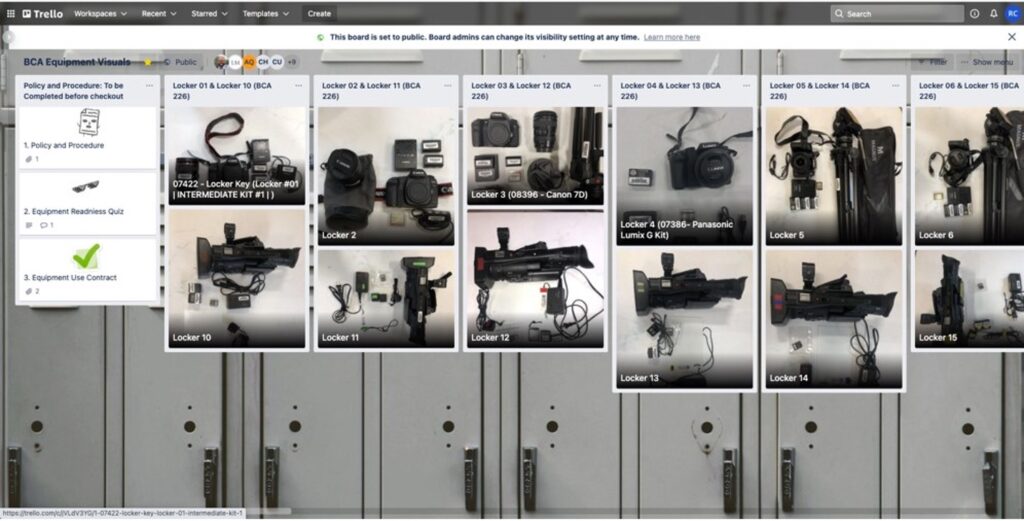
The BCA trello hosts information for all of our bca lockers/equipment available in webcheckout
We can see contents of all the lockers as well as equipment in the Jenks closet
https://trello.com/b/QvzfM3V4/bca-equipment-visuals?search_id=977b6d84-55d5-4428-ac8b-6d762e271ff6
For students to loan out equipment, they have to have read through and done the equipment use quiz and agreement forms. They must also be a communication arts student or have email permission sent to CTS from the chair of the communication arts department.
Criterion
Criterion is used for logging your hours and submitting your timesheets for payroll.
You can access it at the following link using your Gordon email and passphrase login:
https://gordon.criterionhcm.com/
Timesheets are submitted every two weeks on Saturday. You will typically receive an email every two weeks saying when the pay period is over, and you will then need to submit. To submit your time sheet, press the light blue "Submit Timesheet" button in the lower left-hand corner.
Add Hours
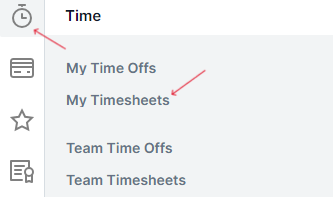
To add hours, you will need to click on the clock icon on the left-hand side and select "My Timesheets". On the next page, in the top right corner you will need to select "Add New"
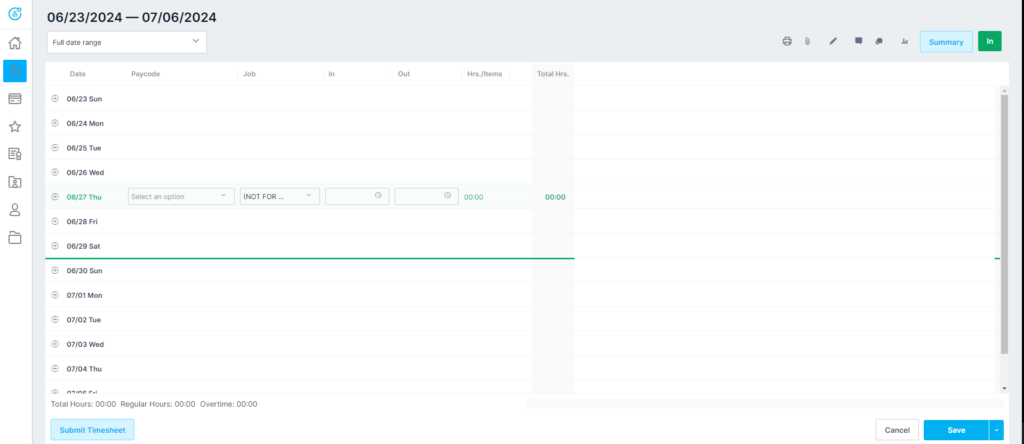
The page will then look like this and to add hours you will need to click the plus button next to the date you are trying to add hours you worked. You will then select the option "Hourly," and in the second drop down menu you will need to select the position for which these hours were worked. You then set your start and end time. Before closing you will want to save the time sheet.
Adjust Hours
To correct wrong hours, you will follow the same steps as if you were recording new ones and you can go to the incorrect date and change the hours or job that you worked for. Once you have saved some submissions there is also the option to delete that time log if you wanted to just delete it and create a new one.
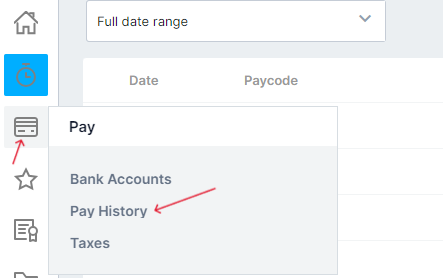
View Pay Info
To view your pay stubs, you can hover over the icon beneath the clock icon and select pay history.
FootPrints
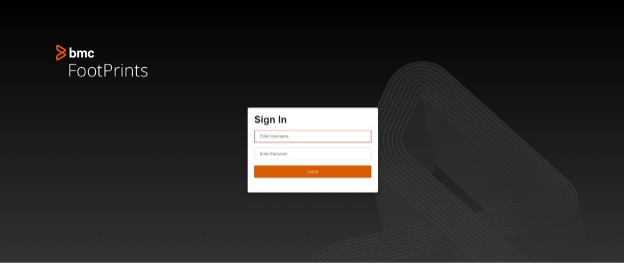
FootPrints is our ticketing system at CTS. All emails coming in to us go though here.
As a HelpDesk tech a large portion of your time will be spent here
https://support.gordon.edu/servicedesk/login.html#runtimecontainer/edit/workspace/22986/8440
Footprints Sign-In
Username - "Firstname.Lastname"
Password - "Gordon Password" (your own)
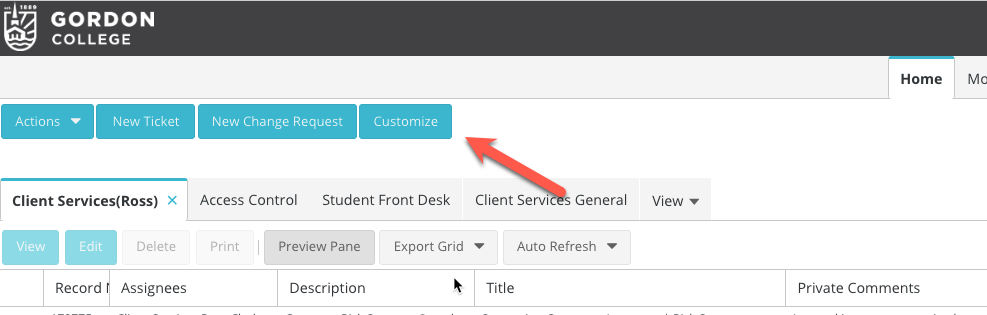
Setup Ticket View
Step 1: You will likely see every CTS ticket at first. Navigate to the 'Customize' button to setup the helpdesk view we need.
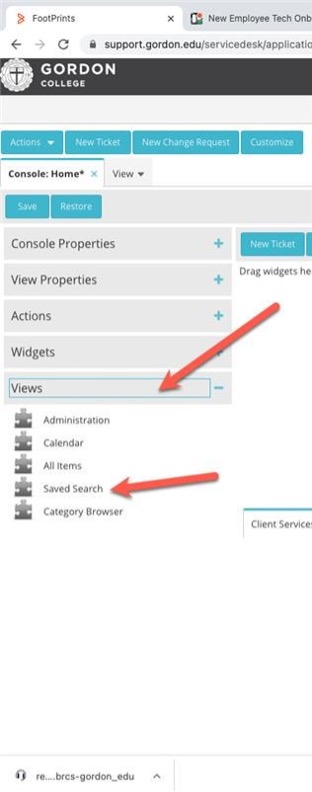
Step 2: In the customize section choose 'views' in the left column and drag and drop ‘saved search’ to the bar in the center of the screen.

Step 3: Once you have added the saved search you can name it along the lines of helpdesk or student staff. Choose the ‘search name’ as ‘student tech group(open)’.
Step 4: Now save your settings in the upper left with the save button
After a refresh of your screen, you should be setup to answer any new and open helpdesk tickets.
Assigning Tickets
On the left side we find the "General Information" section in which we can find the different parts that a ticket includes.
Assignees is what we use in order to direct the tickets to their respective groups inside CTS.
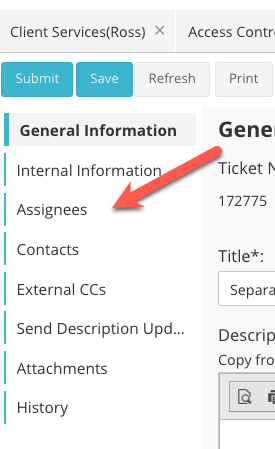
You will find a search bar in which you will type the CTS group that the ticket needs to be sent to in order to get it resolved. The groups are the following:
Client Services: Schedule meetings, personal emails inside CTS groups, specific mac or windows problems or issues that Helpdesk students can't manage.
Information Systems: Jenzabar related issues, database related issues
Network Systems: Network issues, MFA resets for passphrases and account settings, Distribution Lists and Group Threads
- Media services: Classroom or general related issues regarding projectors, zoom, computers..., Scheduled events which need our help to set up
If you are not sure who to send it to, ask another student worker or use the search feature to help you.
Searching old Tickets
When searching old tickets to figure out how to deal with tickets remember this is not an exact science. Only use the results in conjunction with common sense based on the nature of the ticket. Do not just blindly follow what others have done. Each ticket is unique, looking at other tickets is simply a guide
On the top right there is a search field. We can click CTS tickets in the first drop down, leave contains as is, then put in our keyword we are having trouble with such as Mitel

For the results we can open up and look at closed/resolved tickets to see how CTS staff have dealt with tickets or for assigning tickets we can see how tickets were assigned historically. In this case the Mitel keyword shows that the network team primarily deals with the phone system, However upon close inspection certain problems with phones are dealt with through other team members so be careful
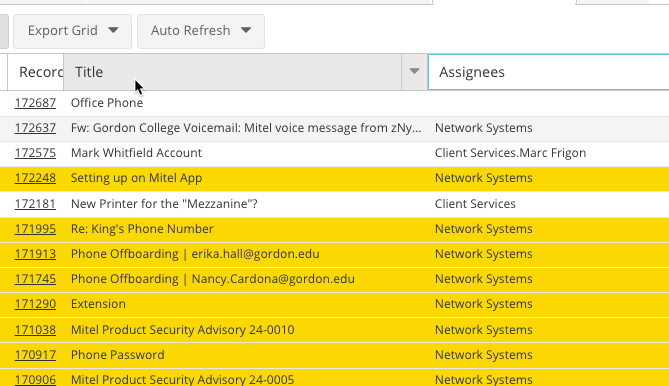
We can also search by Ticket ID number if needed. For this update the center field to ID and enter the specific ticket ID number you are looking for.

NOTE: If after asking another student employee and using the search feature, you are still unable to figure out where the ticket should be assigned then assign it to Client Services.
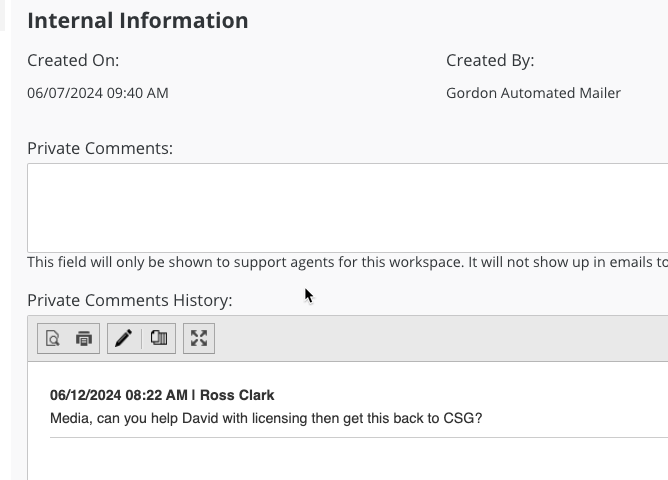
Private Comments
Under "Internal Information," for each ticket there is a place for private comments. These only show up to people within CTS and will not be seen by the person who sent in the ticket. This is a great place to put anything that the assignees perhaps need to know that does not need to be or should not be put in the description viewable to everybody. For example, if assigning a ticket to NSG for an MFA reset, this is a place where you can confirm that you verified identity of the individual when you do.
Private comments is where tickets are internally updated, if for anyone reason we cannot do anything with them yet and they are just sitting in the queue, this is the place to indicate why or what we are waiting on.
If tickets get repopulated into the queue, often the reasoning can be found in the private comments.
Ticket Responses
You need to first read the description history in its entirety to ensure you have full understanding of the issue. And then write your response in the description box.
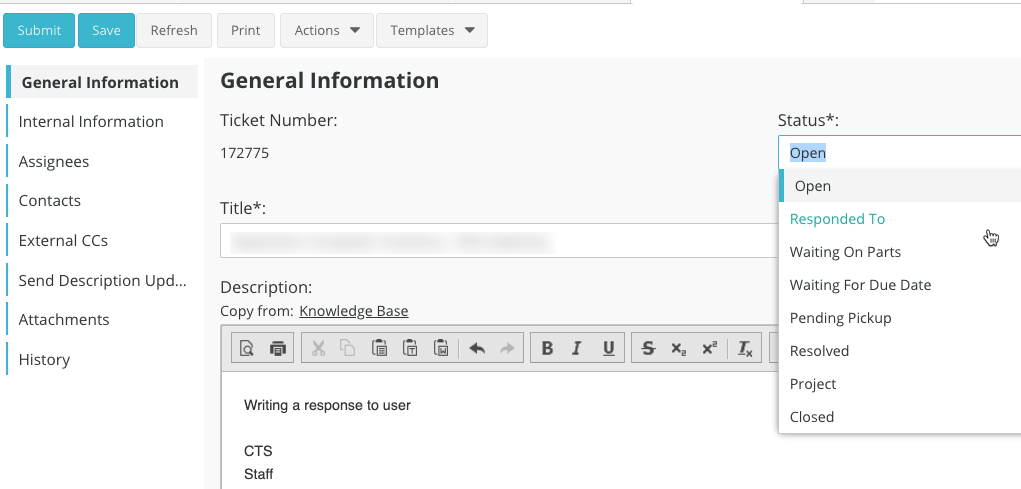
You will then need to set the status of the ticket. If it was issue that was able to be fixed, you can mark it as "Resolved" or "Closed" if you are certain that this ticket is no longer needed. However, more often you are going to want to mark it "Responded To," if you are waiting on an answer/confirmation/or response from the person who sent in the ticket.
Closing Tickets
Mark the status as closed after sending any final response that is necessary. If it is not clear why you are closing it, you should put it in the private comments. It is good practice to do this every time you close a ticket. NOTE: You should only close a ticket if you are sure that everything in its contents has been resolved and nothing else is needed.
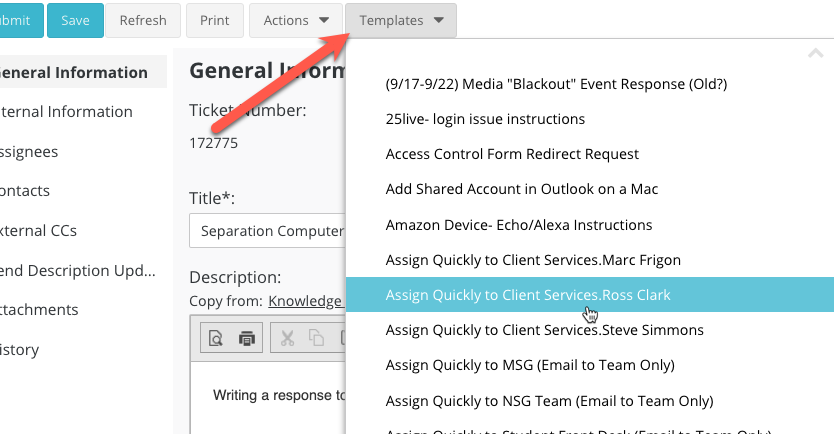
For some tickets, you will be able to use a template to handle it. After you have thoroughly read the description history and contents of the ticket, you may be able to use a template. There are a lot, but they are good to familiarize yourself with. To do so, on an open ticket click the template drop-down menu and scroll to find the appropriate one.
For example, one that is often used is when we get spam or emails from companies trying to sell us something, we can use the "Assign Quickly: Close SPAM or non-issue ticket" template.
This is also used if we get a ticket from a full-time staff member letting everyone know they are leaving early, arriving late, or not coming in at all. In that case, we would copy the ticket contents and send them in the Microsoft Teams In n Out Channel and then we would use the same "Assign Quickly: Close SPAM or non-issue ticket" template.
Do not use a template if you are not familiar with it, or do not know if it is the appropriate response, this can waste time and delay a solution to the issue.
RemoteHelp
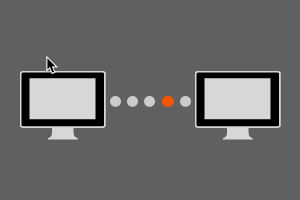
Remotehelp is the webpage we instruct users to go to when we set up a screenshare.
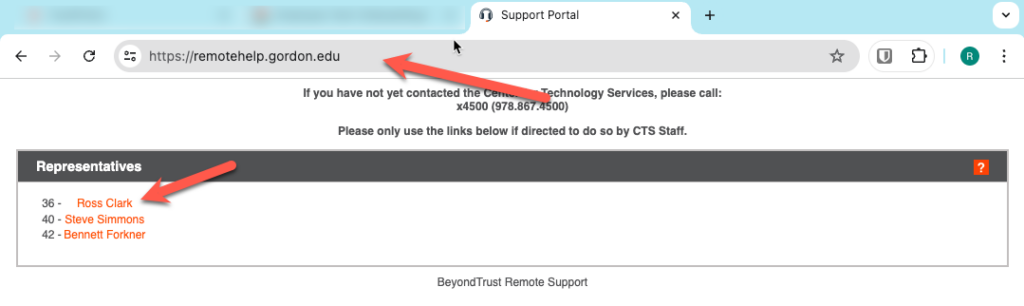
The user will first need to navigate to https://remotehelp.gordon.edu and find the name of the staff member they are working with
PLEASE NOTE: This does not work for those off campus. It will only work if on campus or off campus with the Gordon VPN active
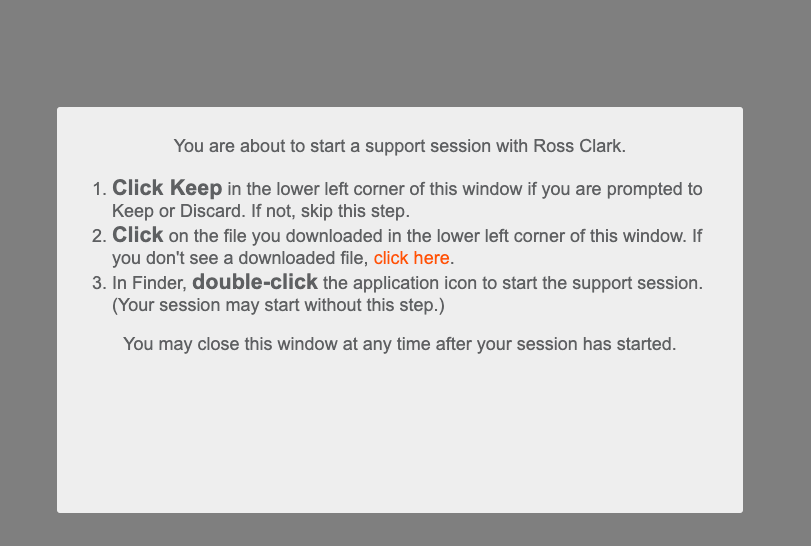
Once the select the staff member a file will begin downloading and they will see a screen like the following
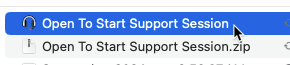
When they download the file they may to to double click it to unzip the folder, then select to start the session
The user is ready to go as soon as they get a loading option
BeyondTrust
Beyond Trust is the representative console of remotehelp.gordon.edu

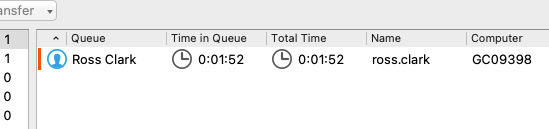
When a user starts a session, they will appear in the queue
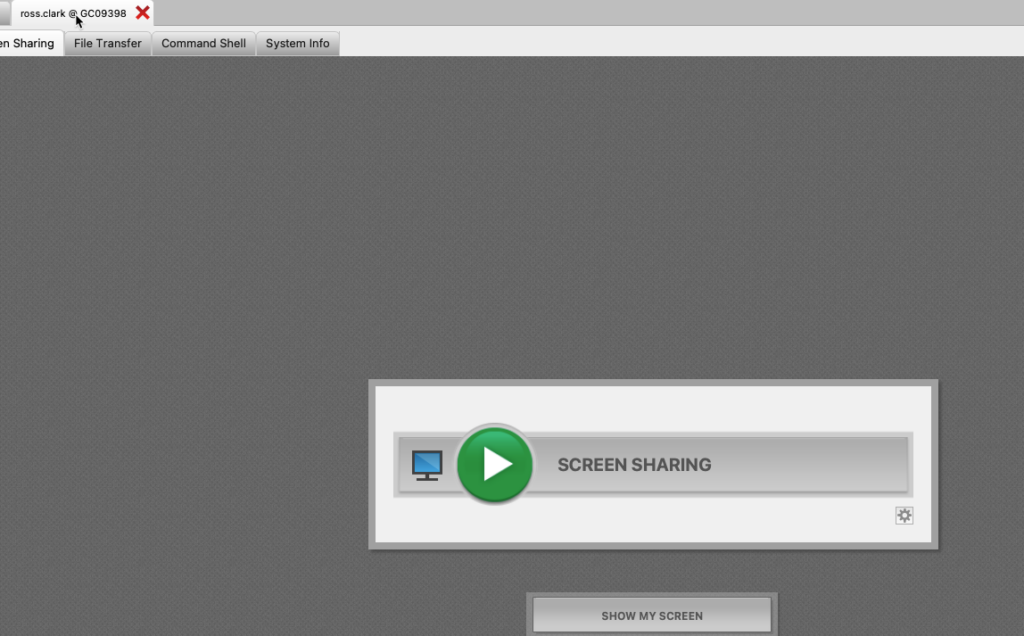
When we double-click on the user, we have the option to begin screen sharing.
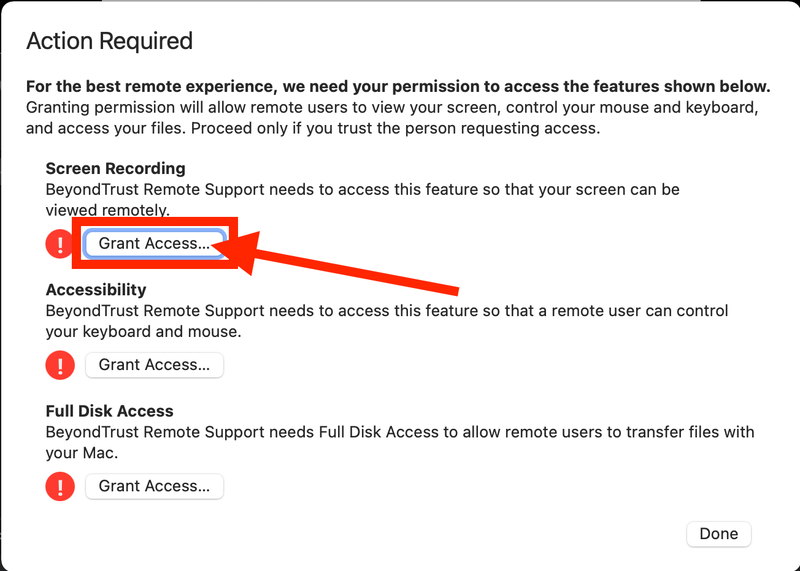
If this is the user's first time connecting, they may need to enable the proper settings. This process will look different depending on the operating system. Typically, only Apple devices require these settings to be enabled
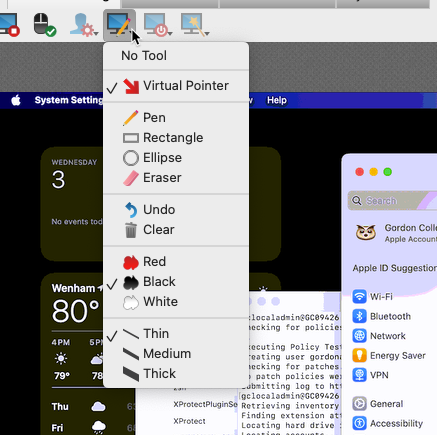
Once in the screen share with settings enabled, you will have access to view and control the user's screen as needed. In most cases, this is all you will need. For advanced cases, we can send files and make changes.
Another option when interacting is to use pointers, pens, and boxes to help guide the user through the steps they need to take to solve their problem.
Ending the session?
It is important to end the session when wrapping up a call with a user. We never want to remain connected to a user when we are not actively talking to them. Click the red 'X' and select 'End Session' to disconnect
MS Teams

Microsoft Teams is a tool we use at the helpdesk for communication between Helpdesk staff and other departments. The shift scheduling for the helpdesk is also done through MS teams as well as several other tools
The student helpdesk chat is primarily used to communicate questions you have in attempting to solve issues that a user is having in the office or over the phone if there is no other way for you to contact them. If you put a message in the teams chat, student's or full-time staff may be able to answer the question. It is also used for updates and important information from full-time staff. This is not a place to ask for shift coverage.
The offer-up chat is used to ask for coverage. You should ask as far in advance as possible to provide the best chance of the helpdesk not going unstaffed. When asking, state the day, date and time of the shift you are trying to offer up. People will respond in this chat whether or not they can take it. It is typically the first person to respond who gets priority claim over taking the shift. If someone can take it, you should offer it up to them through teams so it will show up on their schedule and ensure continuity for timesheet review. When offering to take a shift, you should only do so if you are certain you will be able to take it.
The in n out channel is found in the CTS Teams channel, not a chat group. This is where full-time staff will let everyone know if they will be late or will not be available for any reason and when they will be back. If we receive a ticket from a staff member regarding this, it should be posted in the in n out channel so everyone is made aware in case there are any calls or people coming into the office needing to speak to specific people. It is a useful tool to know who is around and available and who is not, to save time.
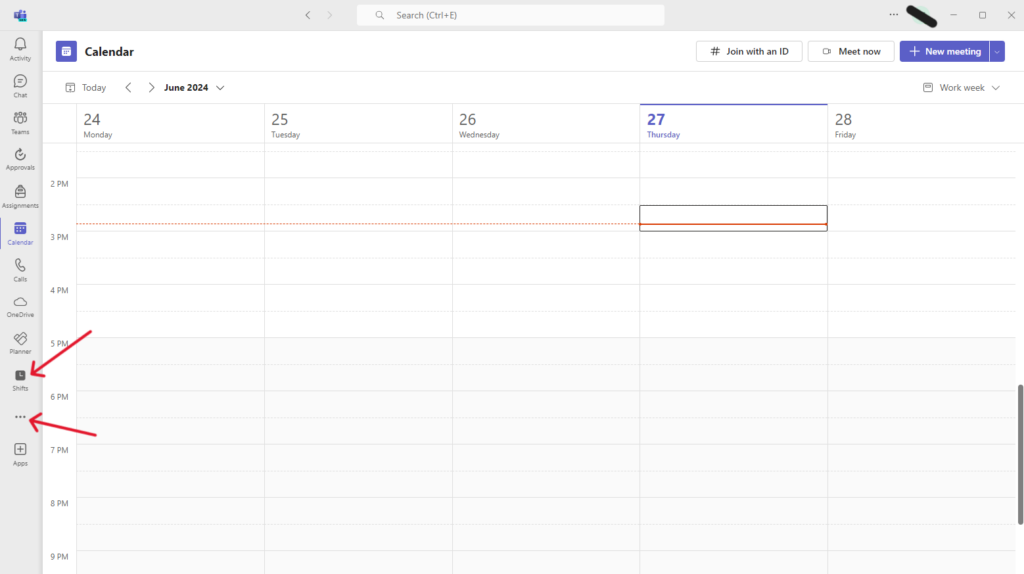
To find the shifts tab within teams it may be a saved quick access tab on the side of your desktop teams' application, or you may have to find it by clicking the three dots at the bottom of the quick access bar where it says more apps and it will be available there. On the phone app you will have to select the three dots where it says more on the far fight of the bottom bar and select it there.
Offer Shifts: To offer shifts, on the shifts tab you will need to locate the date and time of your shift that you want to offer. When you select/click on that shift it will give you the option to offer it up. You can then select a team member to offer it to.
MITEL DESKTOP PHONE
At the helpdesk, you can find two desktop Mitel telephones (one on each side of the main desk) and an extra one on the island for use when more than two calls are ongoing and additional help is available. All of these phones are connected through the Mitel app on the desk computers respectively.
At Gordon, we communicate through 'extensions' (4-digit codes) assigned to different departments and each staff and faculty member. Next to every phone, you will find an information list with the main extensions we work with, such as Media Services, Information Systems, Network Systems, and any miscellaneous extensions we might need to contact. This simple paper guide is easy to understand and conveniently placed right in front of your eyes
Being at the Helpdesk also includes assisting the dispatch office (Gordon Police) with 'Operator Phone Calls.' These calls are from parents, alumni, students, and people outside Gordon who want to reach specific departments regarding personal questions and issues. We help them find the right person to contact to solve their problems.
Operator Calls:
For operator calls, our task is to direct the caller to the appropriate party. During an active call, simply search for the user's name and then drag and drop to complete the transfer.
Transferring CTS Calls:
When dealing with CTS calls, we must handle this differently. We need to consult with the staff member before transferring the call.
- Select the transfer button in the app.
- In the new window, search for the user.
- Select 'consult' to speak to the staff member. Inform them of the caller's name and the reason for the call.
- If the staff member is available, complete the transfer.
- If the staff member declines the call, let the caller know that they are unavailable and transfer to VM if needed
Transfer to VM:
When a staff member is unavailable, we can transfer a call directly to their voicemail. Follow the steps for transferring a CTS call and consulting the staff. If they are unavailable, use the VM option
All of these functions can be done on the physical phone as well. The below video shows how to navigate our desk phone setup.